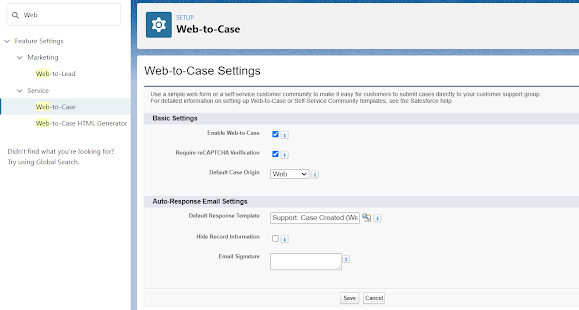
Web-to-Case gives customers an HTML web form for creating cases over the web. So, that customers can easily reach out to the organization's support team. For reducing spam, we add reCAPTCHA in this form. We can also reject cases without reCAPTCHA Verification if we select this option to require reCAPTCHA verification on the Web-to-Case settings Page.
If you don't know what is Web-to-Case and how to create this form to get customers' cases then Read my previous blog (Web to Case in Salesforce).
Prerequisites For Web-to-Case reCAPTCHA Verification
- From Setup, Enter Web in Quick Find Box, then Select Web-to-Case.
- If Require reCAPTCHA Verification is not selected then click on the checkbox to select this and leave the default settings as it is.
- Click on Save.
How to create reCAPTCHA API Key Pair
- Open Google Search and type https://www.google.com/recaptcha/admin/create.
- Now, You have to register your website for reCAPTCHA. Enter a label that will make it easy for you to identify your site in the future.
- You have to choose the reCAPTCHA type for the site. Choose reCAPTCHA v2 and then select "I'm not a robot" Checkbox. If you want to go through in details about types of reCAPTCHA, then Click Here.
- Put your domain name. All subdomains are considered which is related to the domain you put here. Your registration is restricted to the domains you enter here, and to all related subdomains.
- Owners email id is the one from which google id you fill up this form. And if you want to add any other email address than you can put it.
- Accept the reCAPTCHA Terms of Service.
- Then Select checkbox to send alerts to owners if google detects some problems with your site.
- Click on Submit.
- Copy and Paste this Site and Secret Key which we use at the time of creating the case.
Generate Web-to-Case Form With reCAPTCHA
- From Setup, Enter Web in Quick Find Box and then select Web-to-Case HTML Generator.
- Choose the fields which will be shown on your website.
- Deselect Visible in Self-Service Portal.
- Enter the URL to which the user will return after submitting the case.
- Now, For put reCAPTCHA API Key Pair. Click on the search icon.
- Enable Sever Fallback checkbox. So, it allow all traffic if the google servers that enable reCAPTCHA are down.
- Click on Finished. Let's see it in action.
I just want to show you that it works or not. So, I will create a new post on blogger and paste the whole HTML in html view.
Now, I just click on preview to show this page.
You can see in the above image that we get the reCAPTCHA option. So, Customer has to click on the "I'm not a robot" checkbox before submitting this form.
That's it! You can give design or style to this form page as you want. Hope you understand how to generate reCAPTCHA Key through google and how to use reCAPTCHA in Web-to-case form? Still if you have any further suggestions, thoughts, and question then just make sure to comment down here and let me know.
Next Up, Salesforce Email-to-Case in detail.


Comments